eBrowser model

An eBrowser model is a stand-alone 3D model file that has an .ebmx or .ebm file extension and contains 3D model information associated with the 3D model objects of a project. eBrowser models can be published (exported) from Plant Modeller either automatically using the Plant Modeller service as described in Plant Modeller services or manually as described below. A published model can contain the complete design or just specific parts of it, and you can publish as many different kinds of model instances as required.
eBrowser models can be viewed in various CADMATIC model viewers such as eBrowser, eShare, and eGo. Models can be set to expire, so that after a specific date they can no longer be opened in any viewer. If a project administrator has specified that all published models expire (see eBrowser Expiration), a designer publishing a model cannot remove the expiration function but can adjust the expiration date.
Publishing an eBrowser model
Perform the following to publish one or more eBrowser model files.
Prerequisites
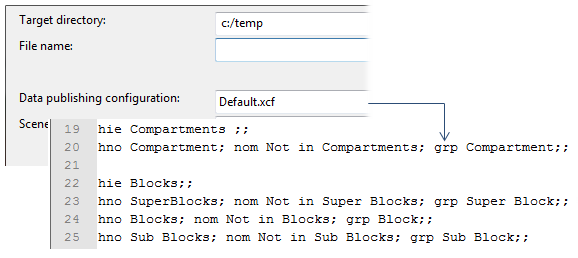
- Create a 3D publishing control to define the object hierarchies and attributes to be extracted. Publishing controls are located in the project database, in File > Environment > All library and project > [project] > 3D Export Settings > 3D Publishing Control. There is a default control object Default.xcf that you can use, but you should customize the settings according to your company's requirements.
- Create the walkaround settings, such as initial camera angle, object lighting, and predefined scenes for quick navigation to specific locations. You can do this from Home > Views > Walkaround as described in Walkaround settings for publishing, or you can run the setup during the publishing process described below. As part of the walkaround settings, also select a Surface shading style for coloring the objects in the 3D model.
- Optionally, create a Custom XSL file user data object to define how object attributes will be presented when users are viewing object details in the model.
- Optionally, define Visualization sets that users can select when viewing the model.
Do the following:
-
Select Model tab > Publishing group > eBrowser model and then what to publish:
-
Publish – Select this to publish a single model.
-
Publish several models – Select this to publish multiple models at the same time.
-
Publish from set – Select this to publish a model from a set of objects that you select before publishing. This option you might only want to select in some special, one-time situations, because the publishing settings will not be saved and also you will not be able to specify model's expiration period.
-
-
If you selected Publish or Publish several models, a Publish eBrowser Model dialog opens for selecting models and specifying their expiration.
-
Set the List publishing parameters option to display either Private publishing parameters (stored in your computer as *.eBP files) or Project publishing parameters that anyone working in the same project can use.
-
To create new publishing parameters (to define a new model export), click New and enter a descriptive name. Then specify the publishing parameters as described below.
-
To modify existing parameters, select one publishing item from the list pane and click Modify. Then specify the publishing parameters as described below.
-
In the Model is expiring settings, specify model expiration if needed. If a project administrator has enabled expiration for all models, here the option is dimmed and default expiration date is displayed next to it; you cannot remove expiration, but you can adjust the expiration period by entering the required date in the Year, Month, and Day fields.
-
To publish, select the required publishing items from the list pane and click OK.
-
-
If you selected Publish from set, or if you are creating a new export or modifying an existing export, a Publish eBrowser Model dialog opens for defining the publishing parameters. Enter the following information and click OK (when publishing from a set, this performs the publishing).
Model publishing options
Option
Description
Specify the directory where the model file will be saved.
Specify the name of the model file.
Specify the type of the model file.
-
eBrowser (*.ebmx) – Default format.
-
eBrowser compatibility mode (*.ebm) – Old format, can be used in environments where .ebmx is not yet supported.
Select a 3D Publishing Control object that defines the hierarchies and object attributes to be extracted.
If the area already has a walkaround configuration and you want to use that, set this to "Use area walkaround configuration". Otherwise, click New to create a new configuration, and set this to "Use current walkaround configuration".
Select this option to export all objects from the design area.
Clear this option to specify the exported objects with a project query.
Select a project query for defining the object set to be exported.
If selected, the nodes of equipment are listed when the user selects View Details in eBrowser, and each node can be expanded to show its attributes. These attributes are included by default:
Name of node [nod]
Id string of node [nd1]
X coord of connection [x]
Y coord of connection [y]
Z coord of connection [z]The default attribute descriptions can be customized, and other attributes added, by editing the 3D publishing control. For example, adding the following rows to the publishing control would set the description of nod to "Node Name" and add two attributes, Nominal Size and Rating, to the published models:
nod 0; abr nod; dsc Node Name;;
nod 0; abr NS; dsc Nominal size;;
nod 0; abr RT; dsc Rating;;If selected, the cables and their associations to other published objects are published to the model file and can be viewed in eBrowser.
This publishes the cable segments and cable nodes defined in Cable Router even if the cable routing objects are set as inactive in the Plant Modeller inactivity filter. If the publishing selects the exported objects with a project query, the segments and nodes are published only if the query includes the cable trays in the model file.
If selected, you can select a custom XSL to define how object data is presented when the user selects View Details in eBrowser.
If selected, groups are published into the model file and the groups that an object belongs to are shown when the user selects View Details in eBrowser. Note that if Use legacy publish (slower) is selected, groups are not published.
Use legacy publish (slower) Legacy publishing should only be selected if the normal publishing fails for some reason, or if the publishing process is customizing the intermediary model.xml file generated by this older publishing method. Using this publishing method does not allow groups to be published.
Select the default background of the model file. The user will still be able to view the model with a different background.
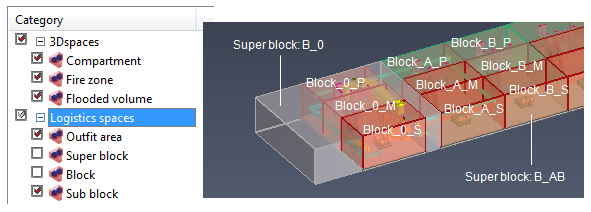
If the model contains 3D spaces such as blocks or service spaces, you can select one such 3D space type to be shown in the model's map function. See Containment in eBrowser.
Force to publish all 3D space objects that is needed for the map
When publishing a map with 3D spaces, selecting this setting includes the objects that relate to those 3D spaces into the model file, even if they are not part of the specified object set.
-
-
Models are published to the specified location. Open a published model in a viewer to check that it looks as intended.


Walkaround settings for publishing
Perform the following to specify walkaround settings for publishing.
Do the following:
-
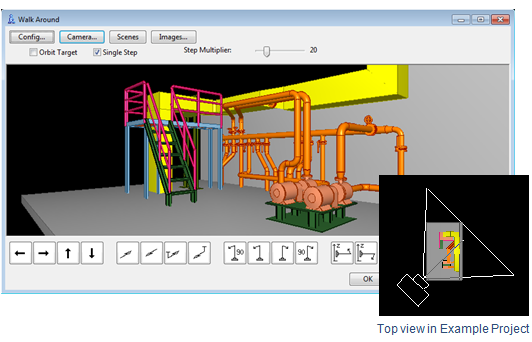
Open the Walk Around tool by selecting Home > Views > Walkaround.
-
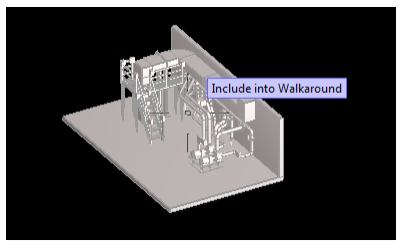
Select the set of objects to include, and press Enter.
-
Select the camera location by clicking. The Walk Around window opens.
-
Select Config > Surface Shading Styles if you want to change how objects are colored.
-
Adjust the camera view until it shows the scene you want to open in eBrowser.
-
Click OK to exit the Walk Around tool.
Note: Parallel scenes cannot be zoomed in eBrowser.
Containment in eBrowser
When publishing containment data into an eBrowser model, the 3D spaces to be published must be activated before publishing the model (only active objects will be published).
Select Model tab > Manage group > Active objects > Inactivity filter, and select the 3D spaces that should be activated.
The 3D Publishing Control file used in publishing includes the definition of hierarchies to be included in the model. You have to modify the file to match your current project and your publishing needs. In the following example, the publishing control creates hierarchies for Compartments and Blocks (including superblocks, blocks and sub blocks). If only Super Blocks and Blocks are active when publishing, the Compartments hierarchy will be empty in the model file. See 3D publishing control for more information on 3D publishing controls.